MODELING TIPS
Vapour Trails models are made of metal so are pretty easy to prepare and paint. As they're only 1/600th scale you don't have to be a Michelangelo to do a good paint-job. There's no 'right way' but I find the following tips produce excellent results for the minimum of blood, sweat, tears and toil ...
BASIC EQUIPMENT
All the following can be found in most good model shops or at probably millions of sites on the web.
Paint Brushes
Three types; size 5 or bigger for general undercoating, a similar sized instrument for dry-brushing (which can be an old semi-decrepit brush past its best) and fine brushes for detail work (such as a 000 size).
Paint
I tend to use modeler's enamel for undercoating, washes and dry-brushing, and acrylics for detailed work. Enamels, though tough on bristles (especially the fine brushes) are great for dry-brushing and usually produce the best colour match.
John Innes Compost No. 1
No, not for potting geraniums whilst you wait for the paint to dry but perfect for creating texture on your bases and target markers. Make sure you sieve out the coarser bits first. Sand is a creditable alternative.
Glue
Two-part epoxy or superglue work best on metals. Use PVA glue for the John Innes.
Brass Tubing
To use for stands. Brass ones tend to be more robust than aluminum, I use Albion Alloys 1/16th x 0.14" tubing (code 125). You'll obviously need a hacksaw to slice to size. Transparent Perspex rods are probably even better but need a bit of drilling.
Piano Wire
Suitable diameter piano wire such as 0.7 mm (22 gauge I think) or less. Make sure it can fit in the hole of the brass tubing. Use pliers or wire-cutters to snip the wire into lengths.
Twist Drill
Also known as a pin drill. Narrow gauge drill bits for fixing the piano wire pin to the model and base. Same diameter as the piano wire.
Sharp Knife
Stanley knife and/or scalpel for the dangerous bit.
Needle Files
Small files in a variety of shapes (half-round is the most versatile).
Patience
The process takes several stages with plenty of drying/setting time in between.

some tools of the trade
from the top; twist drill (screwed into a hand drill attachment), scalpel, needle file, paint brushes, MDF base, decal sheet, untouched Vapour Trails model, piano wire, brass tube.
PAINTING THE AIRCRAFT
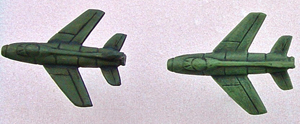
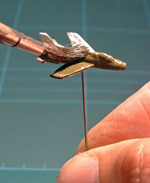
First cut off or file away any flash from the model. Drill a hole and glue in a good length of piano wire. Paint the model all over in the base colour e.g. silver if the aircraft exhibited itself in bare-naked metal, or the main colour if it sported some sort of camouflage. Paint on any different coloured camouflaged patches.
If the underside will be visible paint this in the appropriate colour (usually a light grey or very light blue). Use a fine brush to paint black lines along the joins and other details on the model, including round the cockpit. This helps to define the model and avoid it looking like an amorphous blob. Paint the glass areas a blue-grey colour and add highlights of almost white. Paint in the canopy frames.
For an easy life add transfers/decals such as Dom's Decals (available from Tumbling Dice) Pit Road or those found in kits of plastic 1/700th carrier aircraft (usually produced by Japanese makers such as Tamiya). Otherwise, those with a steady hand and eagle eye can paint the markings; roundels are relatively easy but stars can be a right bugger.
 A more realistic look for camouflage colours
can be obtained using the dry-brushing method. Once the base coat
is properly dry apply a wash of very weak black paint (e.g. if using
enamels, say one part black to three or four parts paint
thinner or white spirit). The wash will sit in the lines and creases
and give the model a well-used weathered look (model on the left).
A more realistic look for camouflage colours
can be obtained using the dry-brushing method. Once the base coat
is properly dry apply a wash of very weak black paint (e.g. if using
enamels, say one part black to three or four parts paint
thinner or white spirit). The wash will sit in the lines and creases
and give the model a well-used weathered look (model on the left).
Dry-brush when the wash is completely dry; use the thick lumpy bit of paint at the bottom of the tin lightened with a dash of white. Add a bit to the tip of your brush and brush off most of the paint till almost dry. Brush the model lightly so that the raised bits are picked out by the lightened colour (above right).
If the camouflage scheme includes other
patches of colour paint these fairly thinly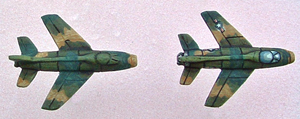 over the base coat and then lightly dry-brush
the patches when dry (model on the left).
over the base coat and then lightly dry-brush
the patches when dry (model on the left).
Complete by adding the cockpit glass, black lines and markings/decals (model on the right).
For extra protection (and to stop the decals from slipping off) the finished article can be varnished. Trim off the piano wire stand to about 10mm. A circle of thin clear plastic sheet makes an effective spinning propeller. This can be cut out using a hole punch and glued on.
MAKING THE BASES
Ready-cut MDF or Perspex bases are available from various wargames suppliers. Alternatively you can cut your own out of thick card, hardboard, metal or a myriad other materials - the heavier the better.
Stick a piano wire pin in the centre and
if texturing is required, cover the top in PVA glue. Sprinkle dried out John Innes No.
1 on the glue. For a really smart base you can print off
'L' (for leader) and 'W' (for wingman) labels and stick one on the
base before you add the texture.
Innes No.
1 on the glue. For a really smart base you can print off
'L' (for leader) and 'W' (for wingman) labels and stick one on the
base before you add the texture.
Paint the base green or light brown and then black wash and dry-brush as above. To finish off dab PVA glue in patches and sprinkle with flock or static grass.
TARGET MARKERS
Target markers can be cut out of sandpaper
covered thin plywood, dry-brushed a suitable earth colour. They
can be spruced up by adding small models
 such as Tumbling Dice's ISL range 1/600th
scale infantry, tanks and guns, or Irregular Miniature's even smaller
2mm range - which includes a useful range of terrain
accessories such as buildings, trees and a even a little railway
train.
such as Tumbling Dice's ISL range 1/600th
scale infantry, tanks and guns, or Irregular Miniature's even smaller
2mm range - which includes a useful range of terrain
accessories such as buildings, trees and a even a little railway
train.
brushing on the base coat